A VLAN (Virtual Local Area Network) is a logical segmentation of a network at Layer 2 (the Data Link layer). Instead of grouping devices based on physical switch ports or cabling, VLANs allow you to group devices logically, regardless of where they’re physically connected.
In practice, a VLAN creates its own broadcast domain. Devices in the same VLAN can communicate with each other as if they were on the same physical switch, while devices in different VLANs are isolated unless routing is explicitly configured.
Think of VLANs as virtual walls inside a switch: traffic stays contained unless you deliberately provide a way through.
Why Use VLANs?
VLANs are foundational in modern networks for several reasons:
1. Improved Security
Sensitive systems (servers, management interfaces, finance systems) can be isolated from general user traffic. Even if devices share the same physical infrastructure, VLAN boundaries prevent unauthorized access by default.
2. Reduced Broadcast Traffic
Broadcasts stay within a VLAN. This limits unnecessary traffic and improves performance, especially in larger networks.
3. Logical Network Design
VLANs let you design networks around function rather than location. For example:
- VLAN 10: Users
- VLAN 20: Servers
- VLAN 30: VoIP
- VLAN 99: Management
4. Scalability and Flexibility
Moves, adds, and changes become easier. A user can move desks and still stay in the same VLAN with a simple switch configuration change.
Key VLAN Concepts and Terminology
Even though all devices connect to the same switch, VLANs logically separate them into isolated broadcast domains.
Understanding VLANs requires a few core concepts.
VLAN ID
Each VLAN is identified by a VLAN ID (VID), a numeric value from 1 to 4094 (with some IDs reserved). Switches use the VLAN ID to determine how frames should be handled.
Access Ports
An access port belongs to a single VLAN. Devices like PCs, printers, and phones typically connect to access ports. Frames entering an access port are untagged.
Trunk Ports
A trunk port carries traffic for multiple VLANs between devices, such as:
- Switch to switch
- Switch to router
- Switch to firewall
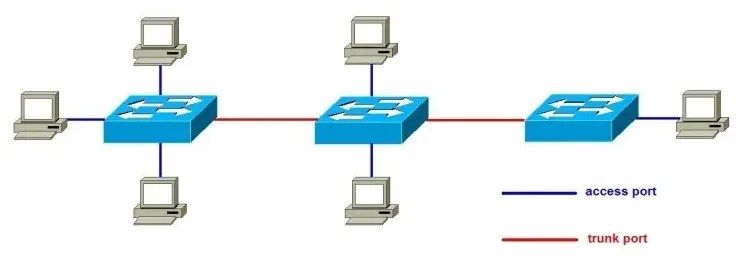
Trunk ports use VLAN tagging so the receiving device knows which VLAN each frame belongs to.
Tagged vs Untagged Traffic
- Tagged traffic includes a VLAN tag inside the Ethernet frame (defined by IEEE 802.1Q). This tag contains the VLAN ID.
- Untagged traffic has no VLAN tag and is assumed to belong to a specific VLAN on that port.
Native VLAN
The native VLAN is the VLAN that carries untagged traffic on a trunk port.
Key points about the native VLAN:
- By default on many vendors, the native VLAN is VLAN 1
- Frames sent on the native VLAN are not tagged
- Native VLAN mismatches can cause traffic leaks and security issues
Best practice is to:
- Change the native VLAN to an unused VLAN
- Avoid using the native VLAN for user or management traffic
Inter-VLAN Routing
1. Router-on-a-Stick
A single router interface is configured as a trunk. Each VLAN is mapped to a subinterface with its own IP address. The router routes traffic between VLANs.
2. Layer 3 Switch
A Layer 3 switch can perform routing internally using SVIs (Switched Virtual Interfaces). Each VLAN has an SVI that acts as the default gateway for that VLAN.
3. Firewall or Dedicated Router
In more complex environments, a firewall or core router handles inter-VLAN routing and enforces security policies.
How Packets Are Forwarded
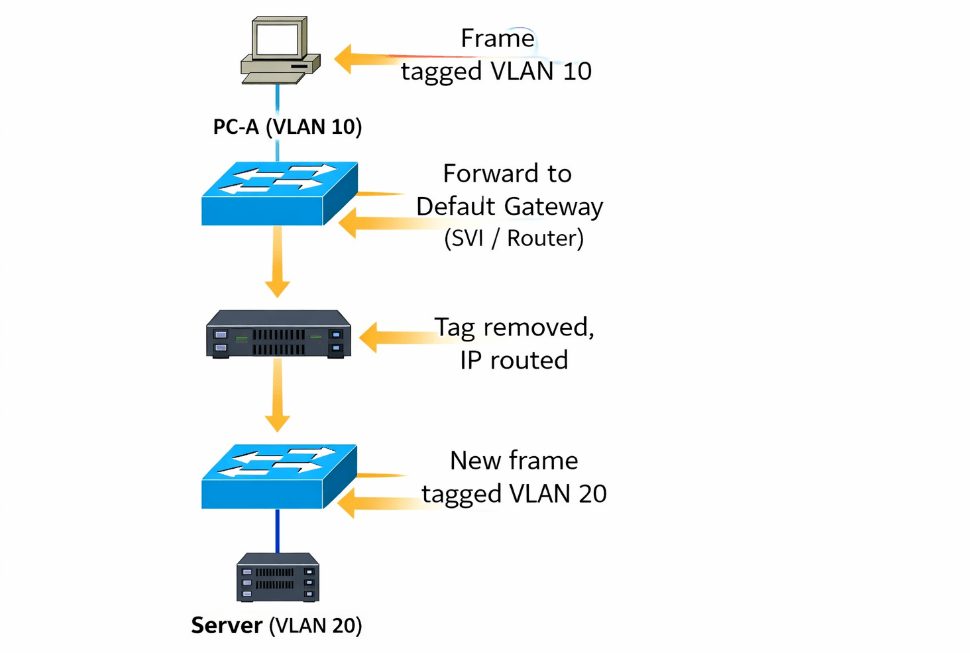
- A host sends traffic to its default gateway (the SVI or router interface for its VLAN).
- The switch forwards the frame within the VLAN.
- The routing device removes the VLAN tag, routes the packet at Layer 3, and re-encapsulates it.
- The packet is tagged with the destination VLAN ID and forwarded to the target VLAN.
VLAN tags exist only within the Layer 2 domain; routing decisions are made based on IP headers.
Basic VLAN Configuration Concept (Vendor-Agnostic)
While syntax varies, the workflow is generally the same:
- Create the VLAN
- Assign a VLAN ID and optional name
- Assign Ports to the VLAN
- Configure access ports for end devices
- Configure Trunk Ports
- Allow required VLANs
- Define the native VLAN
- Configure Layer 3 Interfaces (if routing is needed)
- Create SVIs or router subinterfaces
- Assign IP addresses
- Set Default Gateways on Hosts
- Point hosts to the VLAN’s Layer 3 interface
Additional Concepts Worth Knowing
Voice VLANs
Some switches support voice VLANs, allowing IP phones to tag voice traffic separately while passing untagged data traffic from a connected PC.
VLAN Hopping Attacks
Misconfigured trunks and native VLANs can be exploited. Proper tagging, unused native VLANs, and port security help mitigate this risk.
VLANs vs Subnets
VLANs operate at Layer 2; subnets operate at Layer 3. While they often map one-to-one, they are distinct concepts.
Summary
VLANs are one of the most important building blocks in networking. They provide isolation, structure, and scalability without requiring additional physical infrastructure. Once you understand how VLANs, trunks, tagging, and routing fit together, modern network designs become far easier to reason about.
Mastering VLANs is a key step toward understanding switching, routing, and network security as a whole.

Leave a comment